
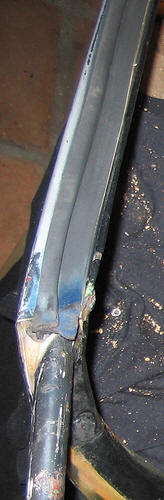
Here's the nut that needs loosening, on the outside, in the door jamb (with a trickle of PB Blaster running from it):

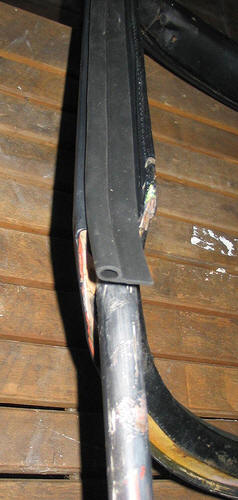
Here's a putty knife being used to separate the seal from the body: it's pretty gooey under there!

I have removed the three bolts at the top, next to the base of the windscreen, five nuts and washers from under the dash top, and the four nuts that secure the two windscreen vent escutcheons. But the top still doesn't want to come off ... is there anything else I need to undo? Arrgh ... don't tell me I have to remove the windscreen?!
Here is a photo of nut that needs to be removed, on the RHS,
under the dash:
Here's the nut that needs loosening, on the outside, in the door jamb (with a
trickle of PB Blaster running from it):
Here's a putty knife being used to separate the seal from the body: it's pretty
gooey under there!
From 2wrench on BCF:
"Open the car door. Note the bolt that holds the front fender to the car. You can see the bolt is going through the tab attached to the fender to hold the fender in place. Ignore this bolt. Forward of the fender bolt or closest to you if you are standing in the open door to the car is the bolt you will loosen. This bolt you are loosening is going through the body of the car and acts to tighten a bracket that sandwhiches/tightens two plates that make up the bracket that holds/secures the windshield post in place under the dash. So the windshield has its post going through the body of the car. At its end is a bolt that must be completely removed in order to remove the windshield. It has been suggested to you only to loosen this bolt at the end of the post. This was only to help control the windshield if she broke loose when you pulled; but, understand that ultimately to remove the windshield, this bolt must be completely unscrewed and removed from the threads on the bottom of the post. Hopefully, lastly, look carefully at the post under the dash and at/on the inside wall that the post is closest to. Can you see that the post is sandwhiched between a bracket? One or two bolts hold the bracket tight on the inside wall under the dash. The other bolt holding the brackt tight is the one you loosened when you opened the car door (the one next to the fender bolt.) These bolts tighten on each side the bracket tight onto the post(s). So.....remove the bolt completely from bottom of post; loosen outside bracket bolt at door opening; loosen the one to two bracket bolts on the inside walls under dash that squeezes bracket tightely around post; spray post and its bracket(s) with lubricant like WD40 or the like; break your rubber seal from the car body and pull on windshield area on each side of windshield."
OK, so finally the windscreen came off, after PB Blaster
and some careful jiggling. The passenger side bolt was reluctant, but yielded
eventually.
I found that it was necessary to cut away part of the rubber body seal, so that
I could more easily insert a palette knife under the seal.
Here is the revealed dash top, after removing the topper:

Once the windscreen lifted off, the topper needed to be pried away: it was glued
down in various places. It's not possible to simply yank it off without risking
damaging the metal dash:


Once off, it was clear from the date "1 JAN 1971" that it was the original piece
![]()

Here is the windscreen, as removed:

Here is a close up showing the orientation of the A-post seals, the originals, and the new replacements. I had a bit of a fiasco with these: initially I stuck them on correctly, then decided they were wrong, and restuck them with the round tube closest to the interior of the car. Then I realised I had them correctly orientated the first time, and removed them again. By now they were looking tatty, and so I ordered two more new ones. The photos show the seals in the correct orientation, looking at the driver's side, upwards from the base of the windscreen.
Here's a photo of one of the sockets for the soft top fasteners. At this point I had stripped and repainted the windscreen frame.
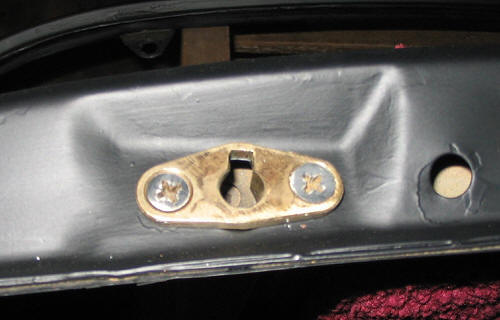
I plugged the hole on the right (which is for a hard top), and its partner on the other side of the frame, with plastic plugs I bought at OSH.
Here's a photo of the frame being replaced on the car. There is a rubber seal that goes between it and the body, which I attached first (to the frame). Prior to inserting the frame, I fixed a new dash topper from Moss in place. I didn't use any glue or sealant on the topper: it will be held very firmly in place by the frame and I'm against using glue unless absolutely necessary.
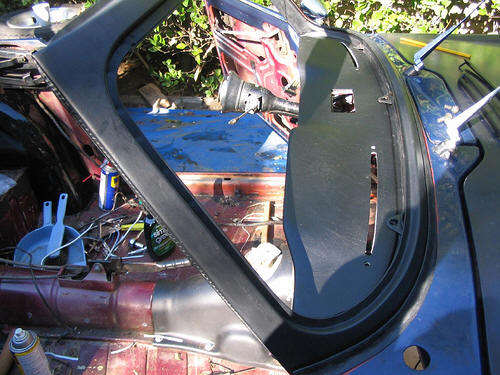
As I tightened down on the support nuts (at each side, under the dash), I eased the edge of the rubber seal up periodically, to prevent it folding under the frame. About half way through, I attached the three bolts to the tabs that sit on top of the dash cover, and started tightening them in sync. as well.
There are three tabs on the
screen that bolt to the dash, through the crashpad. I'm finding that the tabs
bite into the crashpad and distort it somewhat. Not enough to cut the vinyl, but
it doesn't look right. (In fact this is OK, but a lot of
folks have tonneau attachment posts mounted under the tabs, which tend to spread
the load on the vinyl.)

After attaching the frame, I applied a generous line of RTV Silicone sealant to the top of the frame and then riveted the aluminium trim piece to it using 3/16" rivets with a 1/4" shank. (I tried rivets with a shorter shank, but they weren't long enough.)
The windscreen to body seal
tightened down very snug, and I'd be surprised if it leaked. On the other hand,
I wasn't happy with the windscreen to glass rubber seal fit ... especially in
the top outside corners, where the lip of the seal doesn't sit flush against the
frame: there's a couple of millimetres gap.
I used no sealant at all.
For fitting the glass in the windscreen, I first placed the seal on the glass,
then threaded a length of tough nylon multi-strand string into the rubber slot
destined for the frame's lip, leaving the two ends of the string dangling at the
bottom middle of the glass. I then positioned the glass+rubber against the
outside of the frame. I then pushed the bottom edge of glass while pulling on
one end of the string, so bringing the rubber over the lip. I had to be careful
to tug the string in a direction parallel to the glass surface (it's tempting to
try to pull the string at right angles to the glass). As I worked around the
edge of the screen, it got increasingly harder to pull the string.
I found that it was impossible to go all around using the string, and I then
employed a chopstick and nail puller tool to lift the final length of seal over
the lip. I had to work very carefully with the tools because the scope for
slipping and gouging a piece out of the dash, or scratching the glass, is
considerable!
Finally, with the glass secured, I pushed in the plastic silver coated beading
trim all around the groove in the outside of the rubber. The beading I got from
Moss was in a coil, and I was very scared of straightening it out to fit in the
groove ... it felt very fragile. Once I pushed it in all around, I snipped it to
leave a 1/2" gap at the bottom of the windscreen, which I will cover with the
cover piece later, after everything has taken a few weeks to stretch. I'm not
very happy with the fit of the beading, either: it seemed like it should take
more effort to place in the groove.
A photo of the installed glass:

Back to Overview