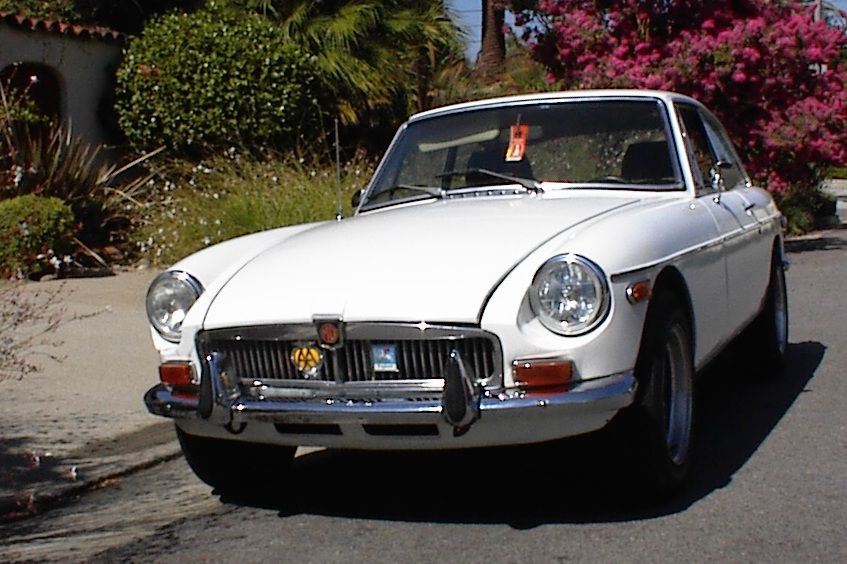
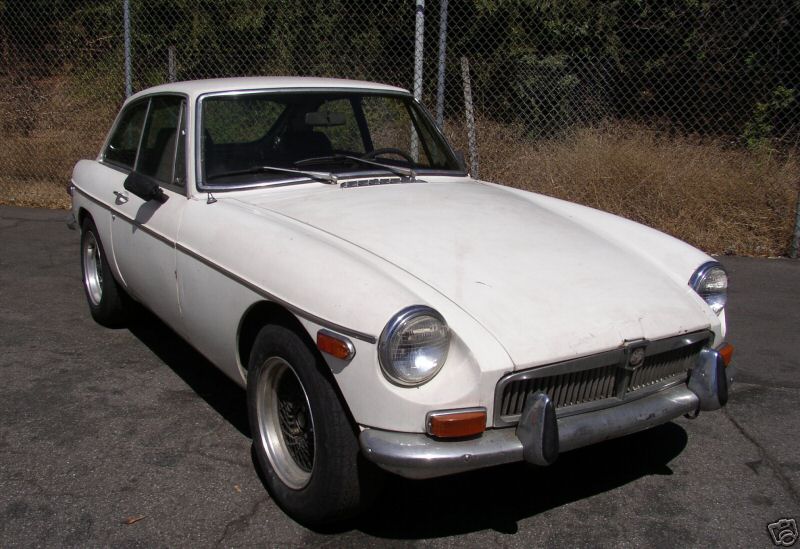
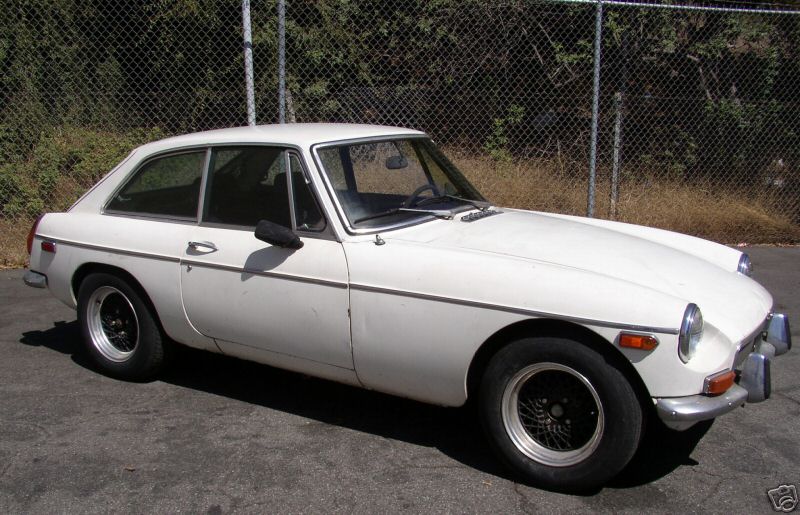
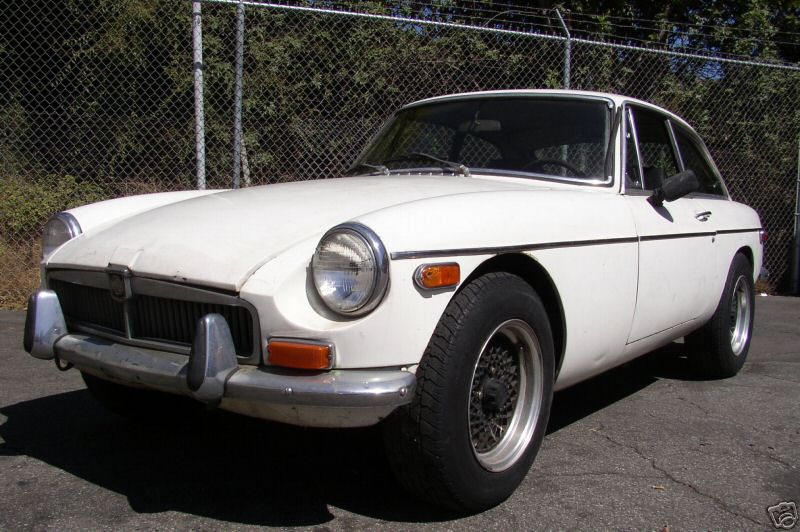
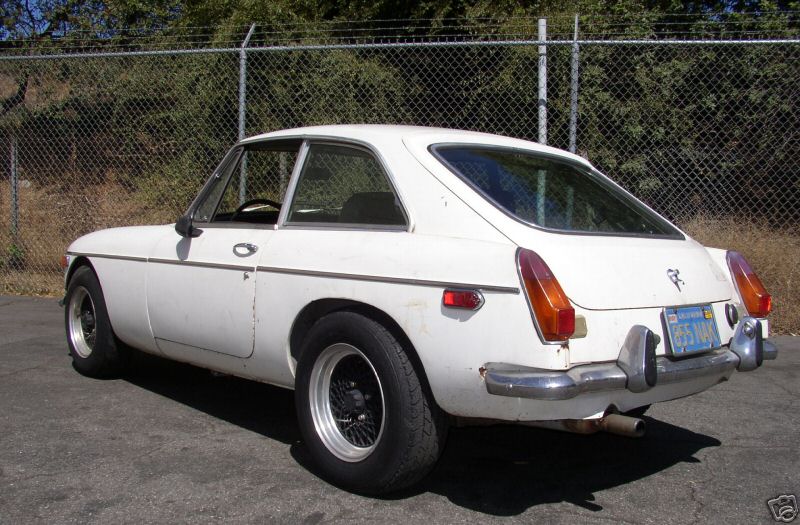
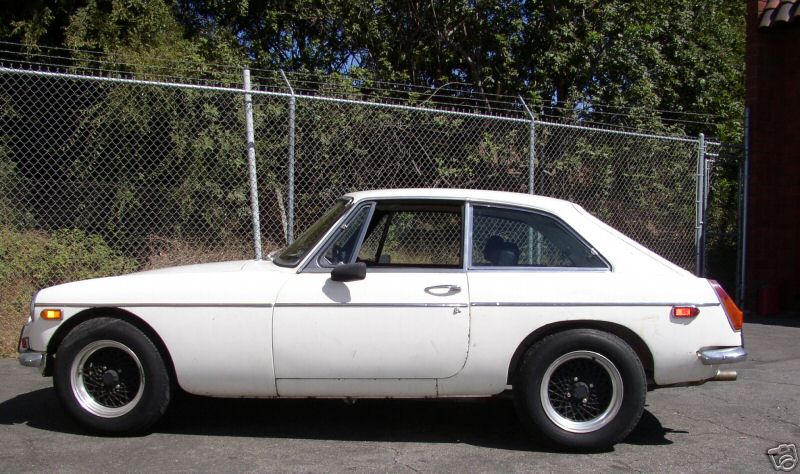
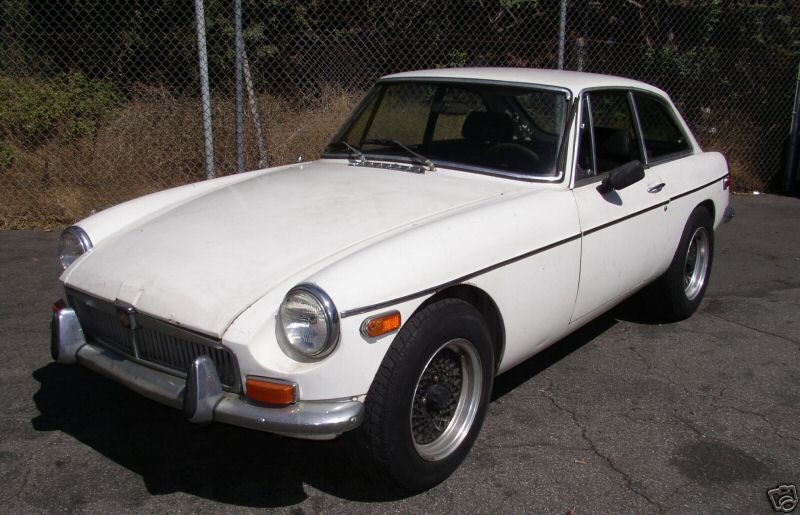
1973 MGB GT "Harold"
(Harold is named in memory of my grandfather, Harold Bird)
VIN: GHD5 UD 319063G

News of Harold (9 Aug 2007)
1) Investigate timing/mixture/carb synch issue
Set mixture, set idle, still idles too fast
2) Reattach airfilters/choke etc.
Done
3) Replace hatchback hinge spring covers (on hand)
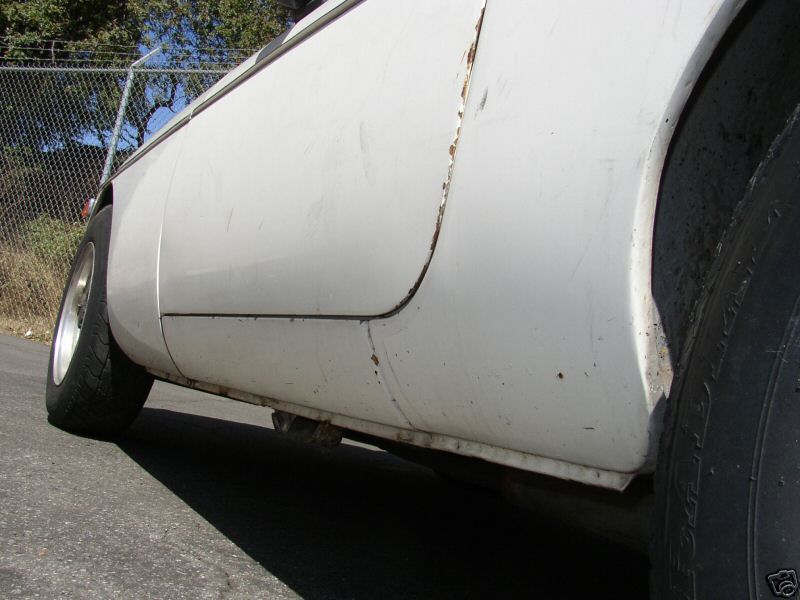
4) Fine cut/polish/wax/touch-up all body panels
Completely repainted with Rustoleum Gloss White
5) Fix windscreen washer pump (used spare unit on hand)
6) Fit new rubber grommets to valve cover (on hand)
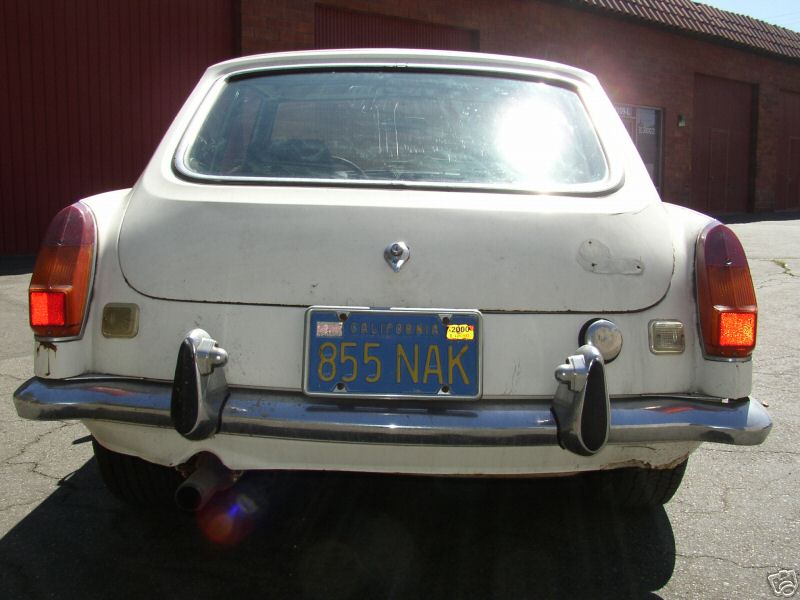
7) Remove, clean and shine rear bumper, buffers, and license plate lights
DONE
8) Replace rear light lenses as a pair
9) Clean all interior panels and roof lining
New List
1)
Investigate running on problem
2) Replace hatchback hinge spring covers (on hand)
3) Fix windscreen washer pump (used spare unit on hand)
4) Fit new rubber grommets to valve cover (on hand)
5) Replace rear light lenses as a pair
6) Clean all interior panels and roof lining
News of Harold (13 Jul 2007)
Updated Harold's "to do" list:
1) Replace windshield rubber seals etc.
DONE (see
separate
page)
2) Replace front brake hoses (new hoses on hand)
DONE
3) Replace brake pressure differential switch (switch coming from Tony)
DONE
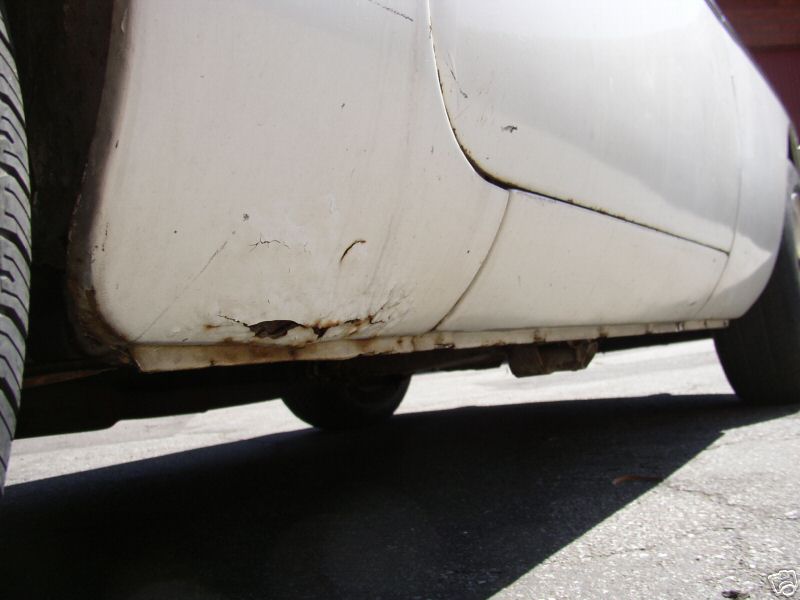
4) Repair rear dogleg rust hole DONE
- Chrome sill covers installed
5) Repair front wing/windscreen rust hole
DONE
6) Investigate timing/mixture/carb synch issue
7) Reattach airfilters/choke etc.
8) Repair rear tailgate bondo repair
DONE
9) Remove bonnet/hood and try to fix shape/bumps around nose
DONE
10) Investigate cost to recover rear seats
DONE - Bought used rear seats on Ebay
11) Cut and fit new carpet pieces
DONE
12) Fit new dashboard topper (on hand)
DONE
13) Replace front bumper (on hand)
DONE
14) Remove, straighten and repaint front air dam
DONE
15) Replace upright interior trim pieces from each side of windscreen
DONE - just cleaned them up
16) Replace hatchback hinge spring covers (on hand)
17) Replace roof courtesy light/switch (on hand)
DONE
18) Finish driver's side footwell kick panels, and fit
DONE
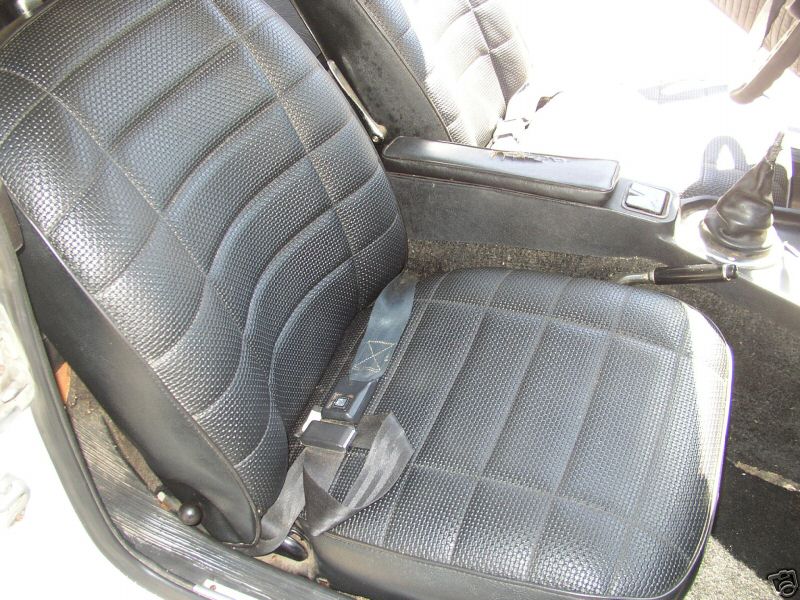
19) Replace passenger side seat DONE
20) Replace lap seat belts (on hand)
DONE
21) Fine cut/polish/wax/touch-up all body panels
22) Replace headlamps with new units (on hand)
DONE
23) Fix windscreen washer pump (used spare unit on hand)
24) Fit new rubber grommets to valve cover (on hand)
25) Repair clip on bulb holder for illuminated cigarette lighter
DONE
26) Remove, clean and shine rear bumper, buffers, and license plate lights
27) Fit new gaskets to all side lights
DONE
28) Replace rear light lenses as a pair
29) Clean all interior panels and roof lining
30) Replace all tyres with 185/70 (currently 195/70SR14)
DONE
New list:
1) Investigate timing/mixture/carb synch issue
2) Reattach airfilters/choke etc.
3) Replace hatchback hinge spring covers (on hand)
4) Fine cut/polish/wax/touch-up all body panels
5) Fix windscreen washer pump (used spare unit on hand)
6) Fit new rubber grommets to valve cover (on hand)
7) Remove, clean and shine rear bumper, buffers, and license plate lights
8) Replace rear light lenses as a pair
9) Clean all interior panels and roof lining
MGB Parts
I am pleased to point to Steve James' mgb parts website.
Windscreen Refit (May/June 2007)
I have devoted a separate page to this topic.
News Of Harold (28 Jan 2007)
Harold took to the road today
(28 Jan 2007) for the first time (since I've had him, anyway), for a
couple of spins around the block:
Nicely warmed up in the garden (Isabella checks I have my seat belt on):

The garden gate is opened:

And off Harold goes!

Returning to the pits after a couple of laps of the block:

Observations: the brakes are still spongy. The engine is very lively, but it's
still ticking over too fast. The steering wheel is so big it rubs on the top of
my legs: no way to reduce the seat height. Maybe I need a smaller wheel.
An update of work done this weekend:
1) The Foam Experiment: the foam ball started the week at 25g, and sat in water
for seven days. It then weighed 34g ... so appears to have taken up 9g of weight
in water.
2) Front brake hoses replaces, and brakes bled. STILL not hard enough. Aaaargh.
3) Air filters and choke cable reattached. I think I need to install a new choke
cable ... the current one (which I thought I had repaired) doesn't seem to work
properly.
4) Reattached wheels, and removed floor jacks
5) Cut new carpet piece for transmission tunnel using old tatty piece as a
template: very easy and fits nicely.
6) Repaired cigarette lighter glow ring bulb holder, refitted, and refitted
centre console, with shift boot and shift knob.
7) Continued messing around with front windscreen and tailgate bondo repairs.
News (22 Jan 2007)
So I have been doing little jobs on
Harold for the last couple of months or so, with the aim of getting him
roadworthy. I've fixed the brakes (mostly) and the clutch, and the choke, as
well as various electrical jobs.
But now I find that I have so many jobs to tackle, I am getting overwhelmed. And
on some, a little out of my depth!
Here, for your consideration, is a list of things I know need doing:
1) Replace windshield rubber seals etc.
2) Replace front brake hoses (new hoses on hand)
3) Replace brake pressure differential switch (switch coming from Tony)
4) Repair rear dogleg rust hole
5) Repair front wing/windscreen rust hole
6) Investigate timing/mixture/carb synch issue
7) Reattach airfilters/choke etc.
8) Repair rear tailgate bondo repair
9) Remove bonnet/hood and try to fix shape/bumps around nose
10) Investigate cost to recover rear seats
11) Cut and fit new carpet pieces
12) Fit new dashboard topper (on hand)
13) Replace front bumper (on hand)
14) Remove, straighten and repaint front air dam
15) Replace upright interior trim pieces from each side of windscreen
16) Replace hatchback hinge spring covers (on hand)
17) Replace roof courtesy light/switch (on hand)
18) Finish driver's side footwell kick panels, and fit
19) Replace passenger side seat
20) Replace lap seat belts (on hand)
21) Fine cut/polish/wax/touch-up all body panels
22) Replace headlamps with new units (on hand)
23) Fix windscreen washer pump (used spare unit on hand)
24) Fit new rubber grommets to valve cover (on hand)
25) Repair clip on bulb holder for illuminated cigarette lighter
26) Remove, clean and shine rear bumper, buffers, and license plate lights
27) Fit new gaskets to all side lights
28) Replace rear light lenses as a pair
29) Clean all interior panels and roof lining
30) Replace all tyres with 185/70 (currently 195/70SR14)
I suppose I need to define some priorities!
Jan 20 2007
There were some cracks in Harold's
paintwork just in front of the windscreen, in between it and the seam of the
front wing. I started sanding away with my Dremel sanding disk and eventually
went through about 1/2" of what appeared to be Bondo, down to rust, which I
cleaned most of to bare metal. Here's a photo:

Detailed version here:
http://farm1.static.flickr.com/187/364245345_48825078fe_o.jpg
Jan 17 2007
Armed with unused yards of "Pleather",
which I used to recover the door topper, I idled away a couple of evenings
making a replacement interior panel for Harold's passenger side footwell. I used
a piece of pegboard, placed the old panel on top, marked around it, and cut the
board to shape. Covering it was very easy using a staple gun.
Here's the old panel:

And here's the new:

(This is the panel that the map pocket affixes to.)
Now I'm on a roll with this, I'd like to do the driver's footwell panels. The
trouble is, they weren't in Harold when I got him, so I have no old panels to
use as templates.
Wishlist
Here is a list of replacement parts I am currently looking for.
3) Hood
8) Carpet pieces
11) Rear seats or covers
Jobs
Roadworthy

3) Replace brake pressure differential switch (switch coming from Tony)
6) Investigate timing/mixture/carb synch issue
 30) Replace all tyres with 185/70 (currently 195/70SR14)


Body Related

1) Replace windshield rubber seals etc.
4) Repair rear dogleg rust hole
5) Repair front wing/windscreen rust hole
8) Repair rear tailgate bondo repair
9) Remove bonnet/hood and try to fix shape/bumps around nose
14) Remove, straighten and repaint front air dam
21) Fine cut/polish/wax/touch-up all body panels

Interior

10) Investigate cost to recover rear seats
11) Cut and fit new carpet pieces
12) Fit new dashboard topper (on hand)
15) Replace upright interior trim pieces from each side of windscreen
16) Replace hatchback hinge spring covers (on hand)
17) Replace roof courtesy light/switch (on hand)
18) Finish driver's side footwell kick panels, and fit
19) Replace passenger side seat
20) Replace lap seat belts (on hand)
29) Clean all interior panels and roof lining

"Cake"

13) Replace front bumper (on hand)
22) Replace headlamps with new units (on hand)
23) Fix windscreen washer pump (used spare unit on hand)
24) Fit new rubber grommets to valve cover (on hand)
26) Remove, clean and shine rear bumper, buffers, and license plate lights
27) Fit new gaskets to all side lights
28) Replace rear light lenses as a pair
Identifying Marks
VIN: GHD5 UD 319063 G
Body number (plate on driver side front engine compartment: GBD 004/94PEngine number (on plate affixed to engine): 18 G-U-H 25079
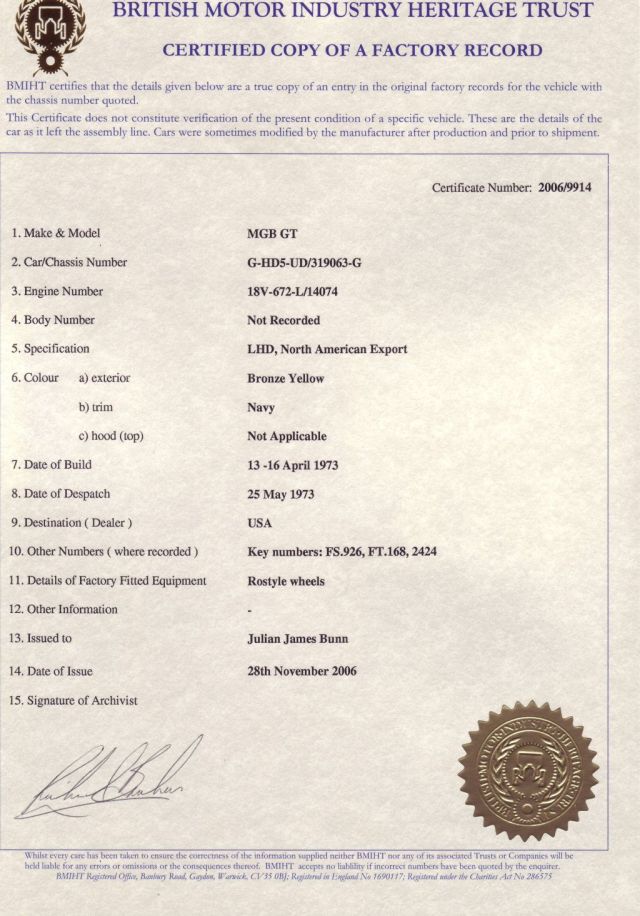
Heritage Certificate
Tie Rod Ends and Steering Boots (Jan 12 2007)
I need to replace the steering
boots. I've read a lot about how to do it, but one aspect is not 100% clear to
me. Where do I unscrew the nut that holds the tie rod end?

Before disassembly, if I scribe a
mark at "A" (see photo):

and measure precisely the distance between A and B, then when I re-assemble, if
I adjust the nut so that the distance is preserved, then the
alignment will be preserved.
The nuts came off easily. In fact
I was expecting a real Charles Atlas moment, and so heaved into the spanner, the
nut came loose and I skinned my thumb on the tie-rod!
Here is the passenger side tie-rod, after the tie-rod end swung away from it:

On the driver side, after removing the gaiter (which had a gaping hole in it):

After unscrewing the tie-rods, I cut away the old
gaiters, cleaned up the rack (I could move it from side to side under the car
just by hand, no need to get up and use the steering wheel).
Then I fitted the new gaiters. Getting the large end of each gaiter over the lip
was tricky. I tightened the large gaiter clamps, but left the small ones loose,
since I knew that I'd have to rotate the tie-rod to screw it back into the
tie-rod end.
Yesterday, for the measurement, I had used a small piece of metal plate which I
pushed one side of against the edge of the nut, and scribed a mark on the
tie-rod at the other side. So I didn't need to measure the distance "A" to "B"
... I just placed the metal plate against the scribed mark, and screwed the nut
on the tie-rod so that it just came to rest at the other side of the plate.
Then I rotated the tie-rods into the tie-rod ends, and screwed them in as far as
the nuts. I tightened the nuts well, and re-checked the distance "A" to "B".
I didn't fancy trying to squirt in 90W gear oil via the small end of the gaiter:
it seemed to me that it would probably go everywhere, and might even ruin the
seal. So I tightened the small gaiter clamps: I wasn't too happy with the size
(this was a kit from Moss), they didn't seem to tighten up enough, so I'll need
to check those for leaks after some use.
I then removed the damper cover so I could use a long funnel and pour the 90W
oil in that way:

Here's the damper and cover, and shim pieces (gaskets?):

Finally, here's a view of the finished job.

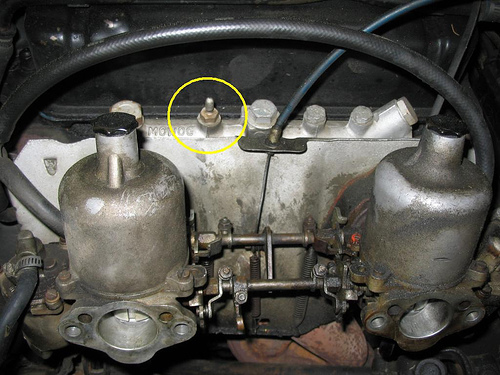
Carburetors
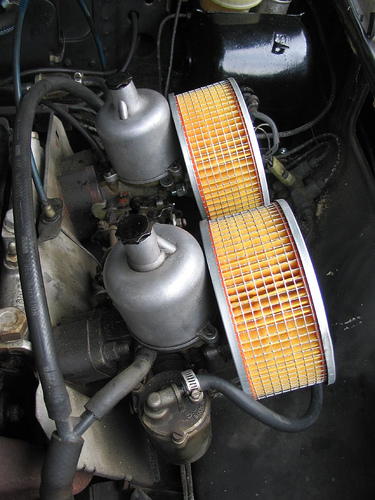
Here's a picture of the carburetors, with the location I will use to attach the manifold vacuum gauge in the console.
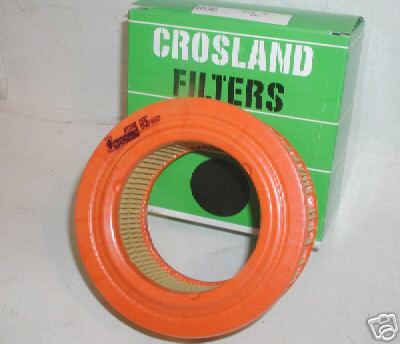
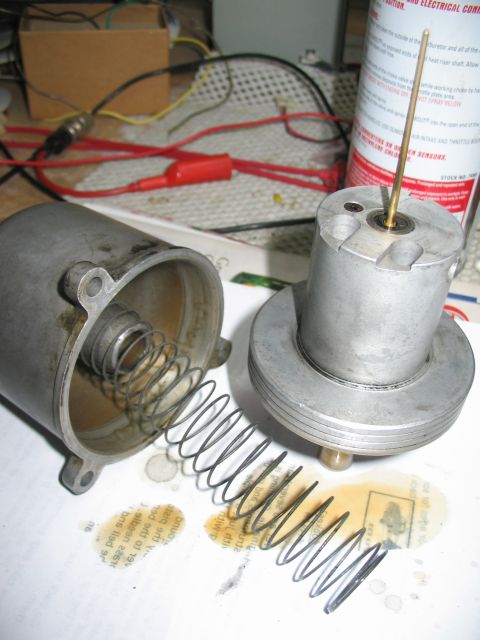
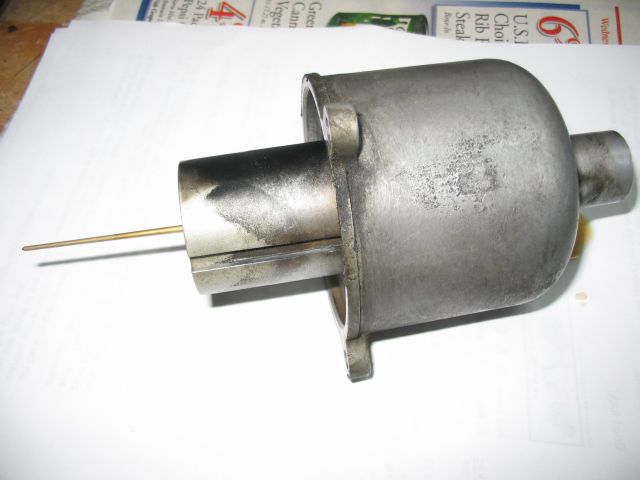
I removed the twin air filters, and prised each apart (these were originally purchased as sealed units, but I wanted to replace the paper filters, and retain the caps). After lots of searching I found some Crosland type 806 filters that were the correct diameter, but a little taller than I needed.
![]()
The left hand carb's piston was stuck (arrowed). I took both carbs apart and cleaned them thoroughly.
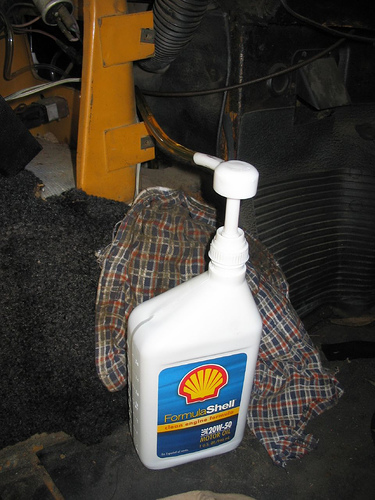
Both needles were in very good condition. The stuck piston freed up after cleaning. After reattaching the carbs I filled the dashpots with 20W-50 oil.
I removed the original pancakes, pryed them apart, and removed the old air filter cassettes. I couldn't find the right size replacement filters (I think these pancakes were bought as a sealed unit and meant to be replaced as such), but I did find some slightly taller Crosland type 806. To refit I had to buy longer bolts and sleeves. I used chicken wire to surround them.

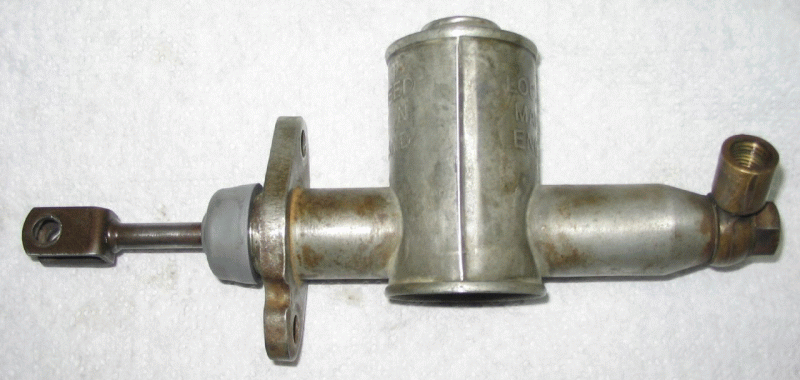
Brake Master Cylinder Refurb
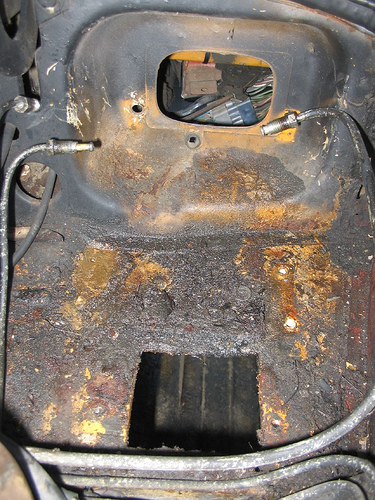
There was clearly a leak somewhere around the clutch and brake master cylinders. I removed the pedal box, detached the hydraulic lines to both cylinders, and then removed the cylinders themselves, plus the pedals and bushes, washers etc.. The location of the pedal box was very dirty with a lot of old rust and paint.
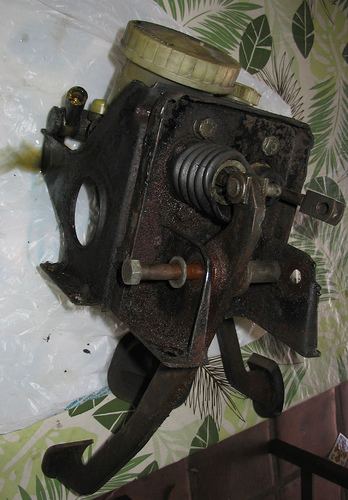
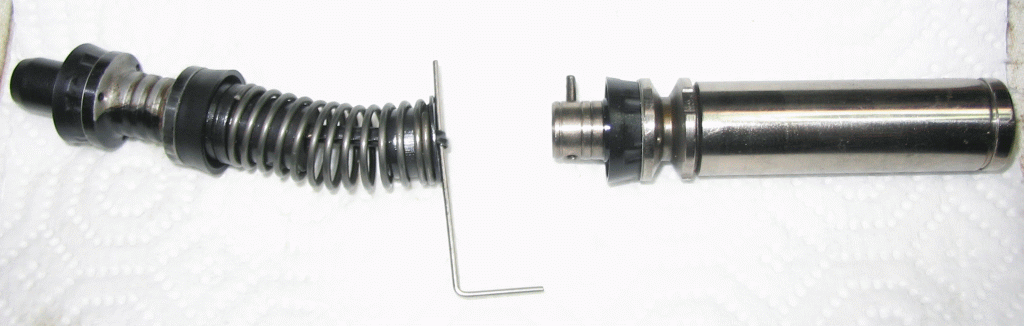
The brake master cylinder is a real bugger to get apart. First problem is removing the retaining spring collar around the plunger. I devised a way of holding the plunger spring down while I extracted the spring collar, by using cable ties and part of an old tube socket. It worked:

Then the real tricky bit, extracting the nylon sleeve. It was impossible to
budge it. But then I had the brainwave of drilling two pilot holes into the
sleeve, inserting a couple of screws, and then slowly lifting it out by screwing
them against a brace piece placed across the plunger end. It worked too!
Tony on the British Car Forum had mentioned the use of long screws, so this
wasn't an entirely original brainwave :-)
(I subsequently found
this article
which describes a similar method, and was very helpful for the later stages of
the dismantling.)
Now, I know this is a tricky job because I went to a local garage yesterday that
repairs old British sports cars, and the owner guy
told me that he doesn't even bother trying to repair these cylinders because
they are so difficult to get apart. He just buys new ones.
Here's the completely dismantled cylinder, with the various plunger parts and
rubber seals, which I now need to replace. Hopefully then I can reattach all the
brake lines and have a working system.

Notice the nylon sleeve at far right, with the screw holes used to withdraw it.
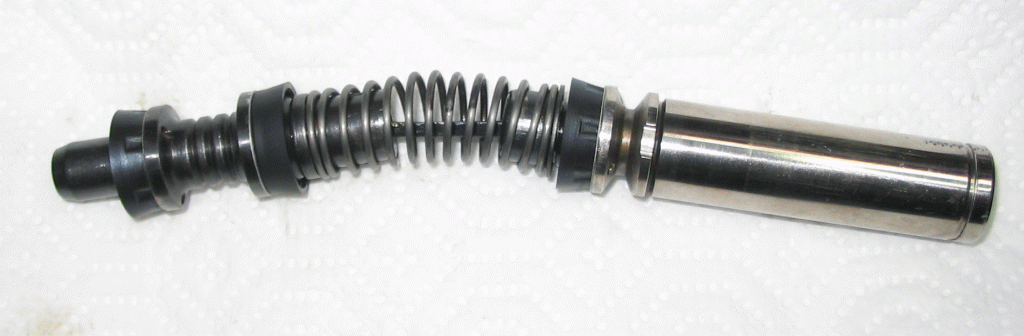
The piston is unblemished except right at the
exposed/pedal end, where there is some scoring from the screws I used to extract
the guide washer (whoops!). But this part of the piston never moves inside the
guide washer, so I believe it's OK.
I came across this article from the old Saab fans:
http://www.vsaab.com/html/Articles/brakemaster.htm
which is very helpful. It's not the same cylinder, but it's close. They say not
to completely remove the pin.
I tapped one of the pins half way out, which allowed me to
unhook the spring guide loop. Then I removed and replaced all the washers and
rubber parts etc.. Refitting was pretty easy: I caught the loop back over the
pin inside the collar, and then fed a nail through the opposite side of the pin,
which mated with the open end of the pin inside the collar, so preventing the
guide loop from coming off while I tapped the pin back into position.
After cleaning up and replacing all the innards and spring clips, everything
looks good: no more leaks from around the nylon washer! So I'm cautiously
optimistic I've fixed the problem.
Update: unfortunately, after pumping the brakes quite a bit, a trickle of fluid appeared from around the piston, and I was forced to the conclusion that the repair had been unsuccessful. I ordered a new Lucas cylinder from Victoria British for $170, and fitted that instead.
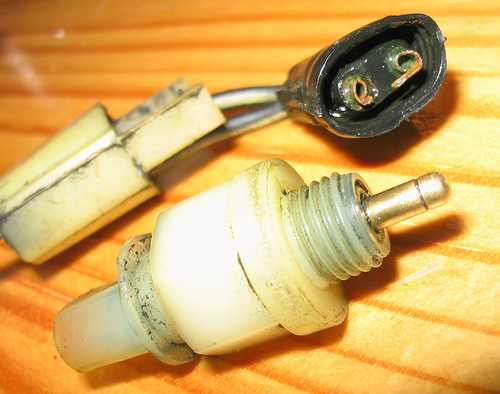
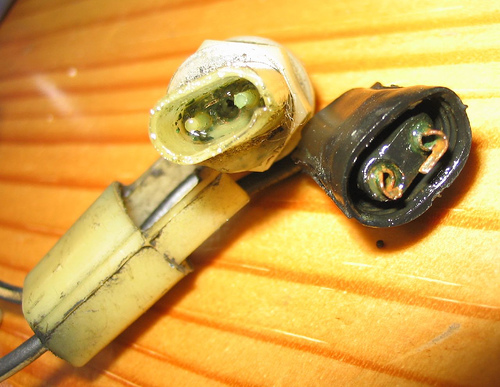
Brake Pressure Warning Switch
Clearly there is something wrong with this switch. Probably needs replacing.
Brake Pipes
I had some trouble bleeding the driver's side rear brake. Once I removed the wheel, the problem was obvious: a flattened pipe. At some point the car must have been towed, and the towing gear was placed so as to squash the pipe against the axle:
I replaced the brake hose and both brake lines.

Today, I looked into replacing the rear brake pads. I have a new set from Moss
(interestingly the Moss price for these is the best I've found ... but in
general I find Moss expensive - on the other hand their online ordering system
is much more advanced than Victoria, who I have given up on after several
frustrating episodes of placing tons of stuff in the shopping cart and then
finding the checkout system failed)
I had to use an impact screwdriver to loosen the two screws holding the drum on
the RH rear. (I bought an excellent impact screwdriver, some Forstner bits, and
a complete imperial tap and die set from Harbor yesterday, at bargain prices.)
But I find that I cannot remove the drum. I've bashed it up a bit with a rubber
hammer and sprayed PB Blaster around the lug posts, but still it wont budge.
The LH rear brake cylinder was completely seized up. How long it has been like
that I can only guess, but it looked like a while. Oddly there was no securing
ring at the rear of the cylinder: after disconnecting the brake pipe I could
pull the cylinder straight off! Looks like I will need to replace the seals, and
get a new securing ring:
After fitting new seals and replacing the cylinder, I then
started to try to attach the new rear brake shoes. These are secured with three
springs.
The three springs were driving me nuts: I couldn't see how
to stretch them so that I could place the hooked ends in the shoe's holes, with
the shoes in the correct position on the backing plate. I knew they had to hook
at the back of the shoes (in a rare stroke of brilliance I had only dismanteld
*one* of the rear wheel brakes, so had the other to refer to!)
Having slept on it, I tackled it again. This time I put the shoes on the ground
and first attached the funny spring with the long straight hook end to both
shoes. Then, keeping the shoes connected with that spring, I offered them up and
managed to get the handbrake mechanism lugs to poke through each one as
required. Then I gingerly attached the top spring, pulling the shoes out at an
angle to do so. I then pried both shoes apart and
located the ends in the tappets of the adjuster (the other ends were already in
the cylinder). Then I attached the guide springs, and finally the easy spring
that goes between the handbrake lugs.
All the time (and now) I felt that there must be a trick/technique I was
missing.
The daft Haynes manual simply says "Reassembly is the reverse of dismantling" or
some such nonsense. Sometimes I feel like putting that book through a heavy duty
shredder :-)
New Handbrake Cable
I fitted a new handbrake cable to
Harold. I also fitted new boots to the handbrake levers on each rear brake drum.
After making all the adjustments to the mechanism, I decided that I would
replace the wheels, lower Harold off the four jacks, and take him for a spin.
By a spin, I mean backwards and forwards a few yards! It sounds very minor, but
it was an exciting moment - when Harold was delivered he had no clutch and no
brakes, so it was the first time he'd actually travelled under his own steam.
The engine fired up very nicely: it is much improved after the tappet
adjustments I did last week. I selected a gear, and off we went, at a leisurely
pace. Quite exhilarating :-)
But the brakes felt spongy ... there must still be some air in the system. I am
so tired of messing with the brakes! (7 Jan 2007)
Clutch Master Cylinder
The clutch cylinder dismantled (much easier than the brake cylinder!):

And fitted, reassembled with new rubber parts etc.:
Clutch Slave Cylinder
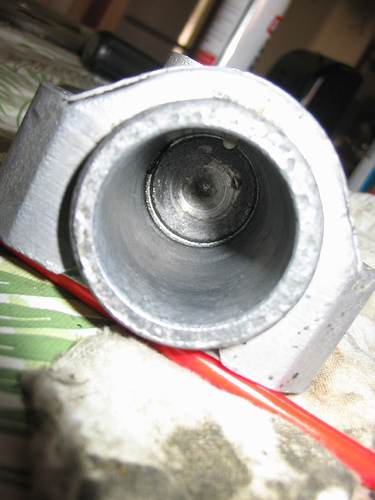
After fitting the master cylinder, and attempting to bleed the system, it was apparent that there was a major leak from the slave! I removed it, and refitted new seals. The bolts holding it were very hard to undo, so I used some "PB Blaster" squirted on over a couple of days, which did the trick. Here's a shot of the bore:
Here is the slave refitted.
Brake and Clutch master cylinders, after rebuild and attached to pedal box.

Dashboard

Here was another problem: Somebody had yanked the choke cable so hard it had come out of the dash! It turned out that, to get at it, required removing nearly all the instruments from the dashboard.
Reverse Lights
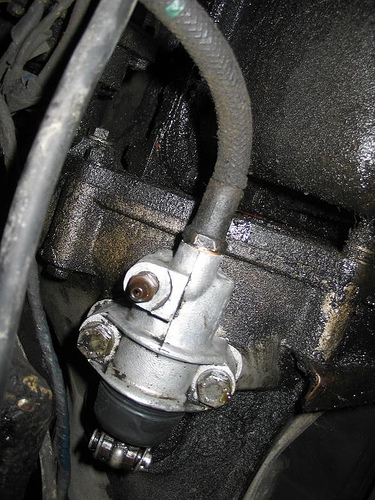
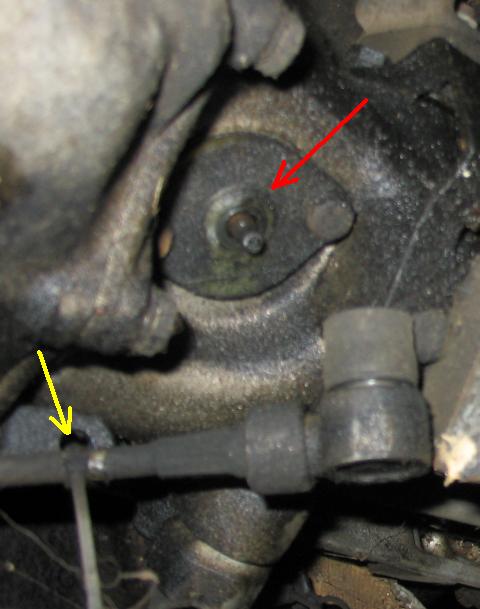
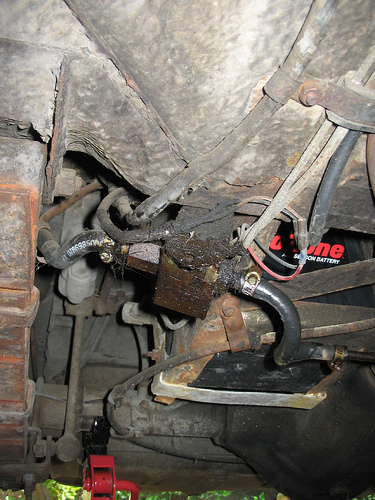
I couldn't understand why the reverse lights weren't coming on when reverse gear was selected. The bulbs and connections were good. I decided to check the reverse light switch. This is hard to find: it's up on the transmission, jut visible from underneath the car in the following photo (yellow arrow). The red arrow is pointing to the opening for the shift boot.
Speedometer Cable and Drive
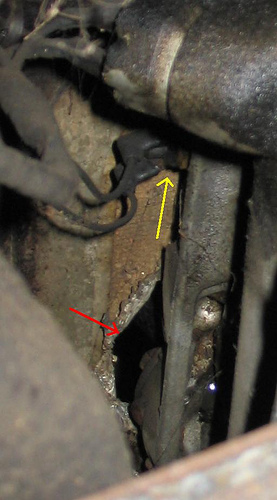
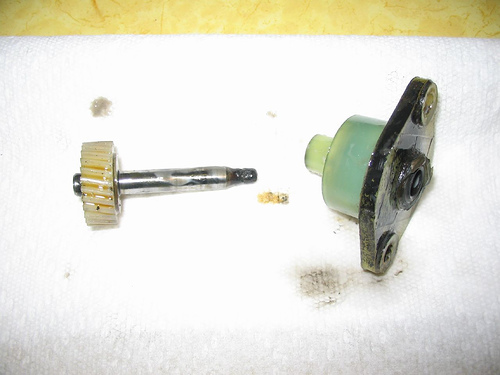
While underneath the car trying to locate the reverse switch, I noticed the following horror:
The red arrow points to the pinion drive plate. The yellow arrow shows a cable tie holding the cable. The angle drive has broken off the pinion at the plate. I removed the plate and pinion, which released quite a bit of transmission oil: it probably needed changing anyway. I found the correct pinion drive piece on Ebay (26 teeth). I probably need a new angle drive and a new speedometer cable while I'm at it. The angle drive is about $50 at Moss! Here's a picture of the pinion, after extraction. The plate and socket seem to be made out of nylon ... I wonder why?
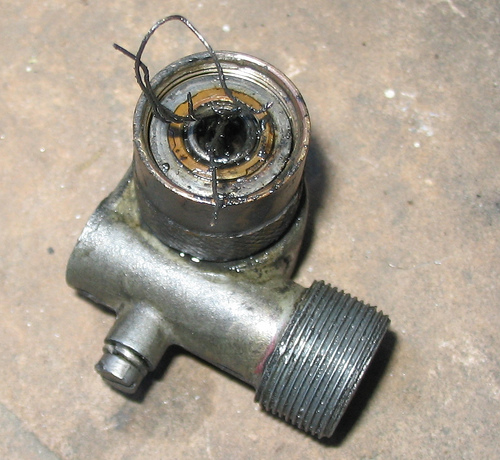
I removed the angle drive from the speedo cable. One problem in getting it off is that the knurled/threaded sleeve connector on the speedo cable is so thin, if you grip it with any force then it distorts a little and wont turn.
Anyway, as you can see I have pulled some wires out of the angle drive. What are
they doing in there? I was expecting to see a square metal boss: but all I see
is these wires.
The thing is almost certainly kaput. I need a replacement! The
small screw on the side of the angle drive is for lubricating
the mechanism inside.
After obtaining replacement parts (a new cable and used angle drive and trunnion) I fitted them all together (note the new gasket in place):
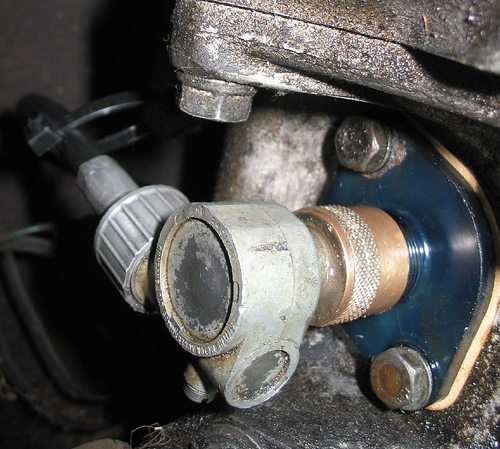
The threads on the nylon piece that holds the trunnion and fits on the gearbox are very easy to cross ... I had quite a game getting the angle drive to screw on straight.
After refilling the gearbox (the filler plug is accessed from an inconvenient hole in the transmission tunnel that is accessed from behind the console inside the car), I fired up the engine, selected a gear, and the speedo worked rightaway!
Here is a photo showing gearbox oil refilling in progress. I used 20w/50 engine oil as specified in the manual.
This is a picture of the short gearbox dipstick, accessed from the hole in the transmission tunnel.

Underneath the Seats!
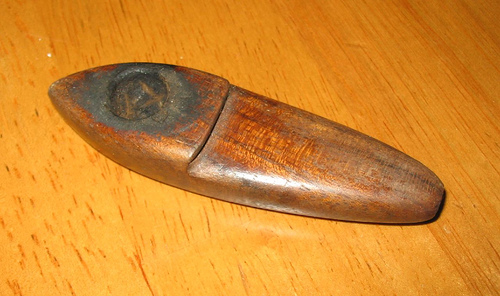
Underneath the driver's seat I found a lipstick and several long hair grips, and this pipe, still smelling sweetly of weed:
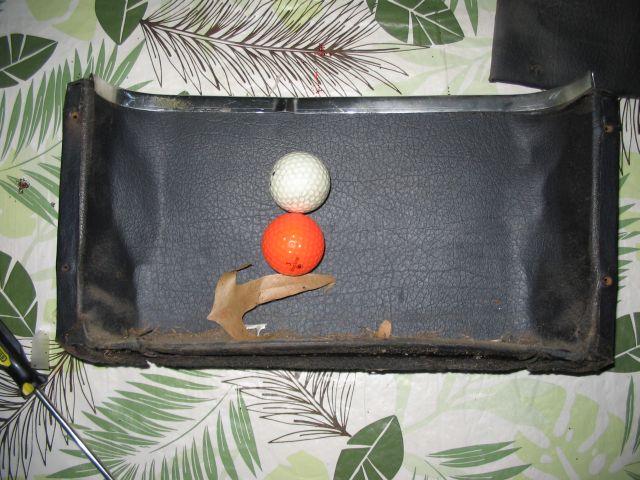
Inside the Map Pocket!
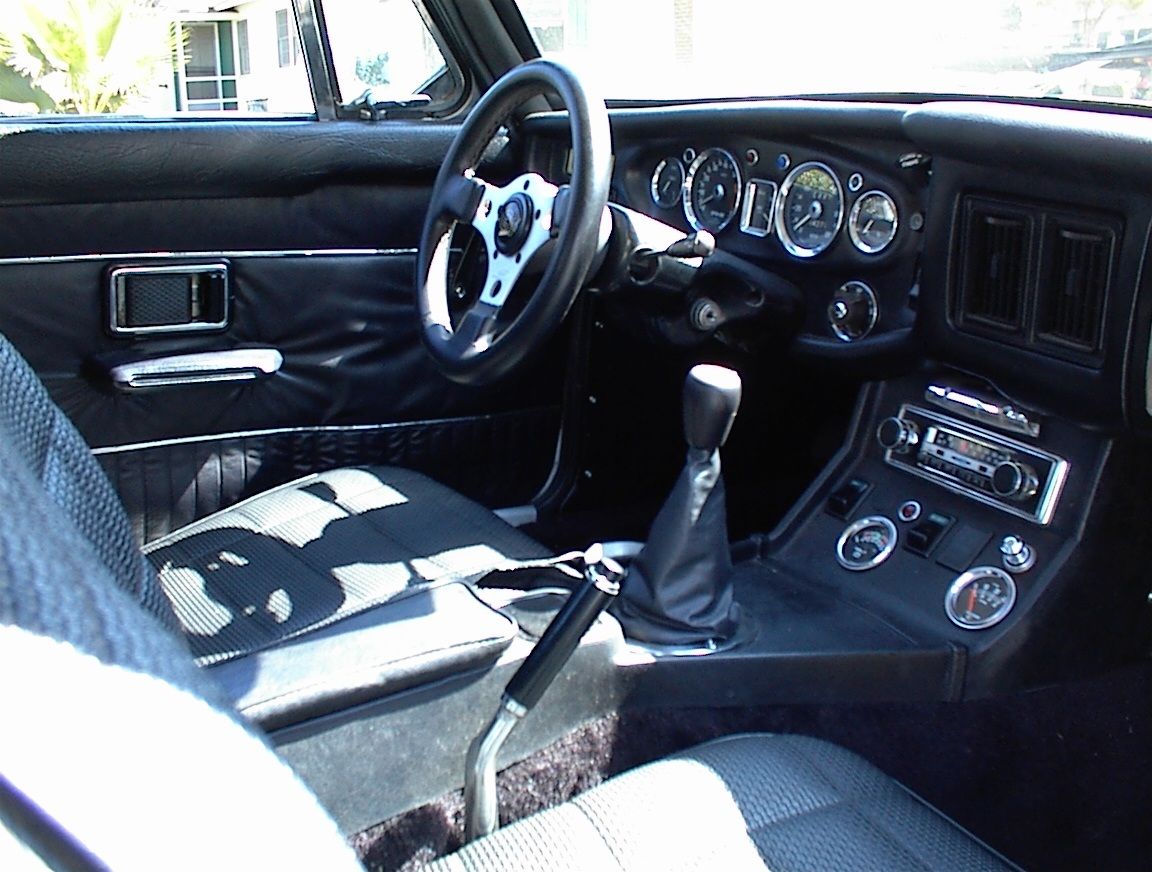
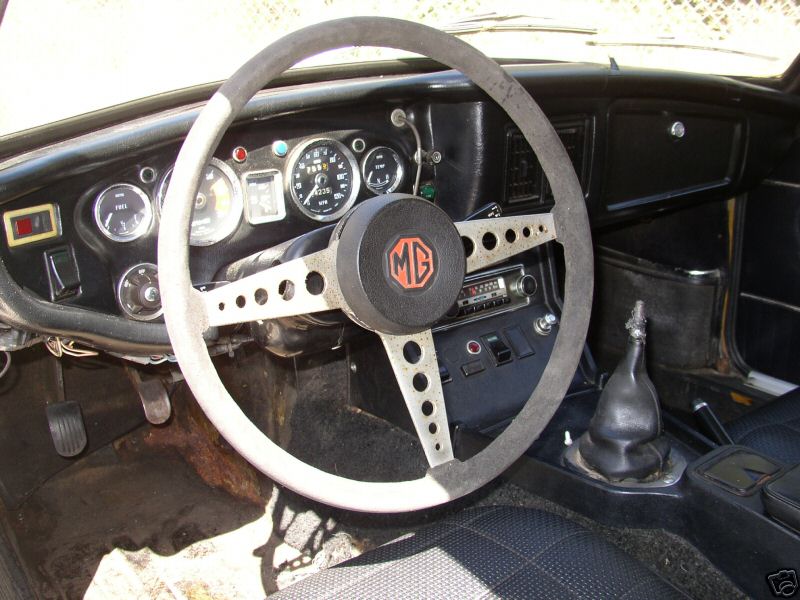
Console Instruments, Switches and Radio

Behind this was a huge collection of dead leaves!
I decided I wanted to add a couple of new gauges, namely a manifold Vacuum gauge, and a Voltmeter. I used a 2" hole saw attachment on my drill to cut the holes for the new gauges, which are nominally 2 1/16" in diameter. They fitted very snugly. I got rid of the "Fasten Seat Belts" warning light, to make enough space.
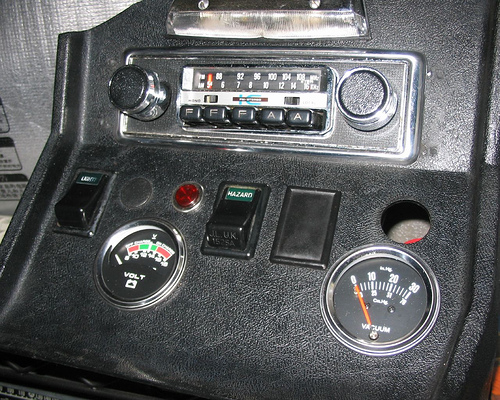
Here's a picture of the rear of the console after wiring up the new gauges, including the vacuum pipe connection for the manifold.

Battery Cut Off
I spent a lot of time removing and reattaching the battery leads while I was working on the car, until I bought one of these on Ebay, for $3.
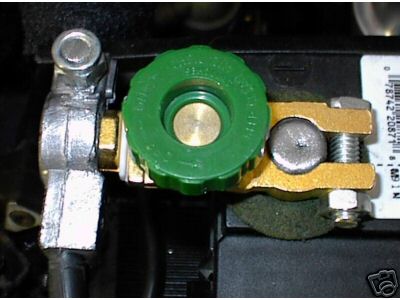
What a bargain! Just unscrew the green knob a few turns, and the battery is disconnected. I may get one of these for my Porsche.
Gear Knob
There seem to be two flavours of gear knob for the MGB: one which has a 3/8" hole, and another which is smaller (3/16"?). Nominally my '73 MGB should take the smaller diameter, but when the one I ordered from Moss arrived, it was too small. This was a pity, because I really wanted a knob as per the original, with the shift pattern engraved. In the end I bought one of these black leather variety on Ebay:
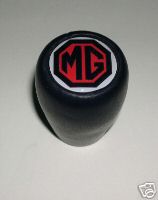
which has a plastic insert that threads itself as you screw the knob down. It looks great!
Calibrating the MGB GT Tachometer
While I had most of the instruments out of the dashboard and console (in order to fix the choke cable), I decided to check the calibration of the Tachometer.
Here's the setup:
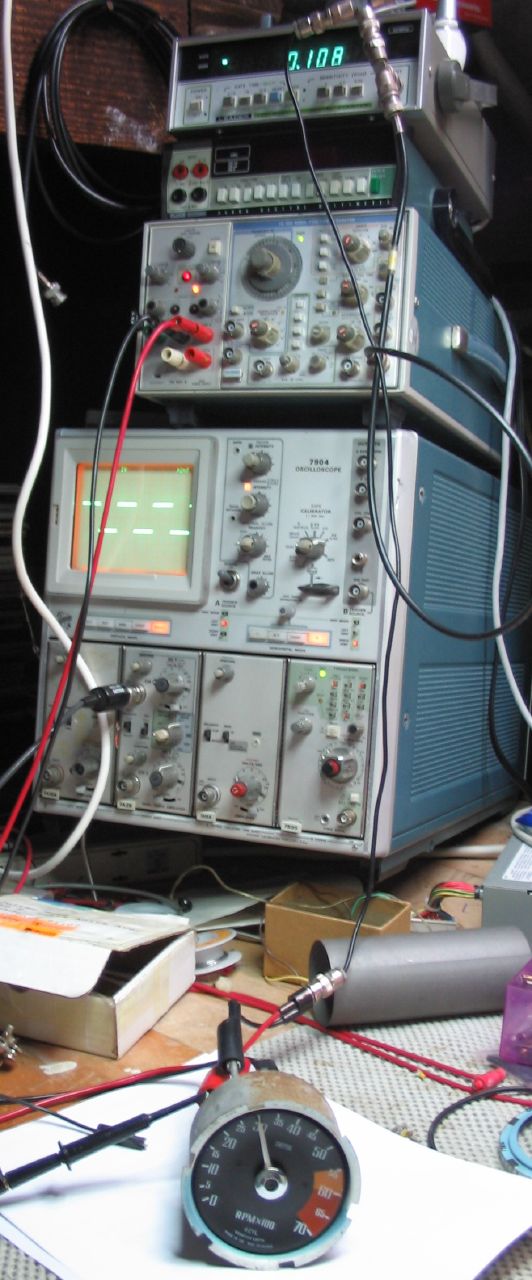
The tachometer is being powered by the Tektronix bench power supply. The signal input is from a Tektronix FG-504 sweep signal generator, using square waves, which are being monitored on the 7904 'scope. The square wave frequency is being monitored by the Leader Frequency Counter (showing 108Hz).
For a four cylinder engine running at 3000 rpm, there are two sparks per revolution, so the spark rate is 6000 per minute, or 100 sparks per second. So, with the frequency generator set to 100Hz, the tachometer should read 3000rpm. There is a 47kOhm pot inside the tachometer that can be adjusted. Here's a view of the inside:
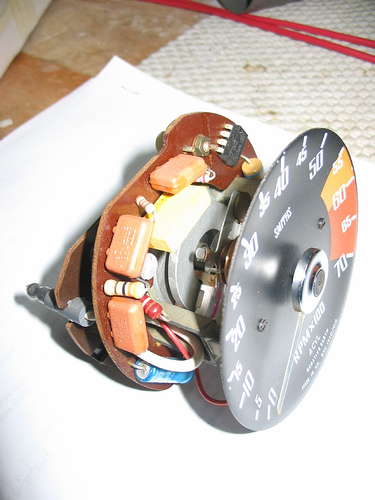
(The trimpot is just out of view ... note the integrated circuit ... somewhat surprising for 1973)
I was able to adjust the pot for exactly 3000rpm at 100Hz. The needle was a bit sticky above about 4000rpm. I came to the conclusion this was mechanical, so I added a little silicon based contact cleaner to the meter spindle, and then exercised the armature by putting the signal generator into "sweep" mode, and sweeping between 100Hz and 250Hz (=7500rpm) continuously over several hours. That freed it up!
Wheels
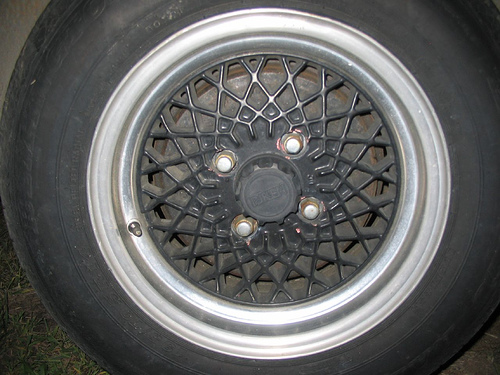
These are Riken "basketweave" wheels, with 195/70SR14 tyres. The tyres are basically shot, but the rims are quite nice. The wheels are possibly a little too large for the car.
Fuel Pump
While I was under the car doing the clutch slave, I noticed the fuel pump was leaking. It was also dangling loose from a single bolt. I replaced it with a new Facet pump ($32 from PepBoys). Here is the before and after:

Dealing with Rust in the boot and driver's footwell
Boot before and after treatment with "POR-15"


Driver's footwell before and after:


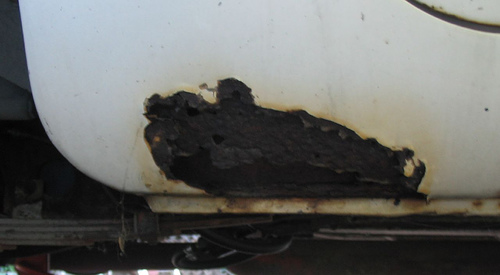
Rust Hole Wisdom
Here is a photo of an area of rust
on the passenger side, just in front of the rear wheel arch. I prodded and poked
out this hole as much as I could with a screwdriver, but the rust probably
extends further.
I don't have any welding gear, and don't really want to invest in any just for
this job. Can I repair it without welding? Or should I bite the bullet and take
it to a body shop? What should I expect to pay for a repair like this?
Jack Long's article on dogleg repair using adhesive, and no welding! http://www.mgsofbaltimore.com/images/stories/Octagram/octagram-sep-oct05.pdf
here are a couple more photos of
the offending area. I cut the outer skin using my Dremel tool, and then broke
off the rusty pieces of the inner metal with some pliers:

(Large version here:
http://farm1.static.flickr.com/124/357595845_12f75e7a17_o.jpg)
I seemed to be cutting through metal, not rust, for the most part. You can also
see some bare metal scratch marks I've made on the sill with a screwdriver.
Now (thank goodness for digital cameras ... I couldn't even see this by eye, but
I was able to put the camera lens right up against the hole) a shot of the
interior cavity:

(Large version here:
http://farm1.static.flickr.com/145/357595946_0ca09eee5a_o.jpg)
Now I have POR-15'ed inside and around the hole, over
everything, and am waiting for it to dry.
I have a crazy idea: use some Touch 'n Foam expanding foam to fill the hole.
After it's dried, sand/shape the outside surface to match, then use some metal
meshing to cover, and then filler/Bondo over that.
Obviously that wont be as strong a metal, but I don't plan on kicking in that
part of the car :-)
don't understand why such a small
hole needs such major treatment, since it's not structural. Why?
The hole is about 9" across, and maybe 5" tall. It's in the outer two metal
sheets which are not load bearing, and really just form the shape of the body.
The sill itself, which is load bearing and is the strength of the car, is in
good condition.
If I understand the body panel diagram, the rocker and inner membrane are very
large pieces, which to fit will require removing a vast area of good metal from
Harold. Not only that but they will need welding ... and I'm not a welder! Or do
I cut the rocker and inner membranes to fit, somehow?
The Touch 'n Foam is water resistant - it's polyurethane - why would it hold
moisture? It expands to an essentially impervious "blob", so any water would
just run off it. Since the inside of the cavity is now POR-15'ed, then it's
protected against rust anyway ... indeed, isn't using new sheet metal panels
just providing more area for rust?
Maybe I'm being too theoretical and analytical about this, and I should just
accept that others have been there and done that, and not go this route.
But then I have a serious problem: I cannot repair Harold myself, and I'm not
sure I can justify hiring a restoration shop to do the work for me - to me
that's like "giving up". My goal is to do a good, lasting repair, that looks
bespoke (as Doc would say) and satisfies me ... I don't really care what any
future owner might think about it, or whether he/she would have done the repair
differently. That maybe sounds callous, but Harold is my car, and I'm not
restoring it for anyone else's benefit, just my own :-)
Here's a couple more photos ...
one taken looking towards the front of the car:

and another head-on after I'd angle ground around the hole to make sure I had
good metal:

I decided to do an experiment: I
squirted out a big ball of the foam filler, and let it set in the open air
overnight. Then I weighed it. Now I have submerged it in a bucket of water, and
will leave it submerged for a few days, to see how much water it absorbs. The
starting weight of the foam ball is 25 grams.
Of course, the only really convincing result of this experiment is if the ball
weighs 25 grams at the end ... ! (In fact, after a week, it
weighed 34 grams.)
The other question is: which is worse, a little water sloshing around against
the interior of the panels, or a little water absorbed by the foam? Once there
is water in that dogleg area, it must slowly evaporate into the air and find its
way out. Perhaps it evaporates more readily if its sloshing around in a
foam-less cavity: I can believe that.
Why isn't there a drain hole in that area? Would it do any good to put in a
drain hole?
I realise I have many more questions than answers about this topic!
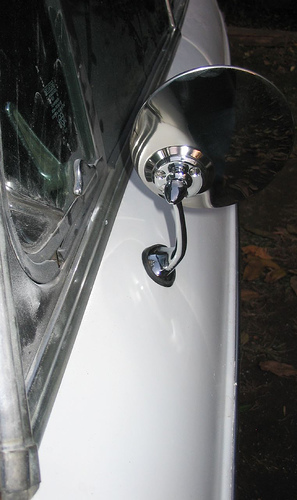
Side Mirrors
I removed the yucky side mirrors, revealing holes in the door panel that were used to affix them, and also a larger hole which was presumably for the original mirrors.
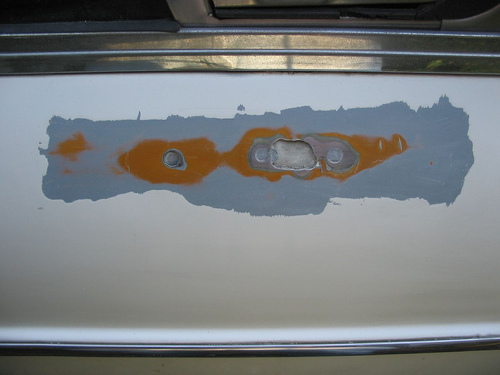
In the above photo I have sanded down through the top coat (white), a layer of primer (grey) the original car colour (bronze yellow), another layer of primer (grey) and then to bare metal. I tried to use Bondo "Plastic Metal" to fill the two smaller holes. It was difficult. In the end I got reasonable adhesion by firmly taping the holes at the back, and not pressing too hard when I squirted the plastic metal against the hole, and letting it dry for a while. Then I sanded down with 80 grit. Then I used a layer of regular Bondo filler. I then sanded that with 320 grit, then applied a coat of white primer, then sanded 320, then a couple of coats of primer, sanding with 1800 grit, and then a white topcoat, then 1800 grit and a final two topcoats. What a faff. And it still didn't look very good - the biggest issue is that the topcoat white is more "blue" then the rest of the car. This of course will be fixed when/if I have the car resprayed.
Here's the driver's side, after painting and fixing the new wing mirror from Moss, which I mounted through the large pre-existing hole.
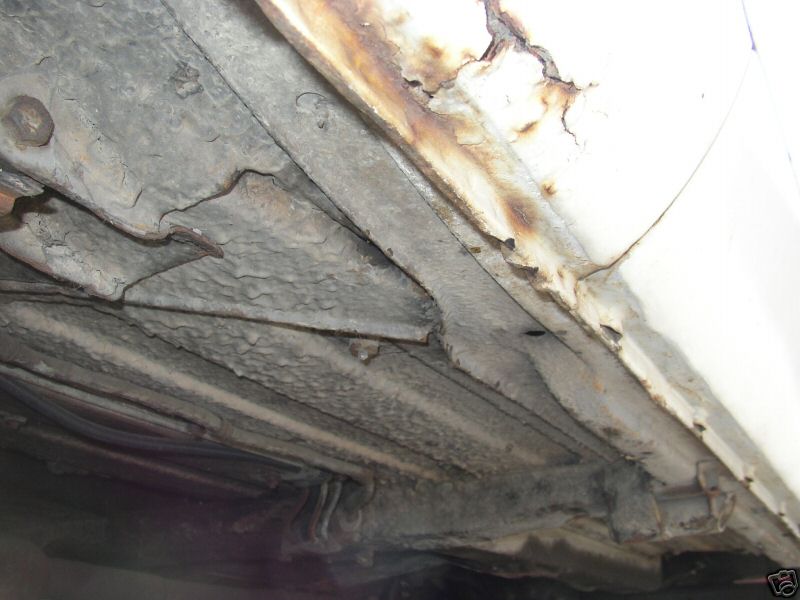
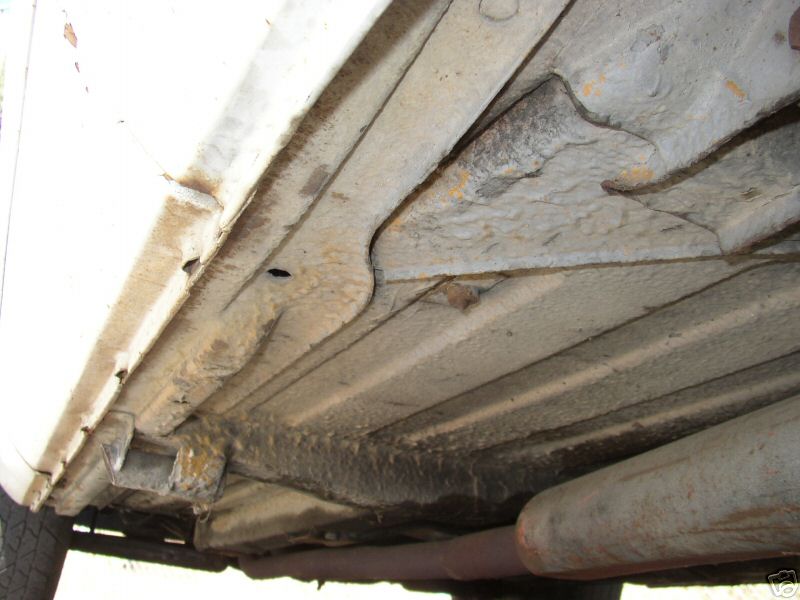
Original Photos from Seller


Wings/Underside
Other MGB GTs
Links
British car forum: http://www.britishcarforum.com/
Awakening a Sleeping B: http://www.theautoist.com/awakening_a_sleeping_b.htm
http://www.teglerizer.com/mgstuff/ob_description.htm
http://www.caroholic.com/73_mgbgt.htm
http://www.rwscars.pwp.blueyonder.co.uk/gt_home.htm
http://members.cox.net/mgbgt/index2.htm
http://www.mgb-stuff.org.uk/bodytext.htm
http://www.britishcarspecialists.com/
Electrics: http://www.mgb-stuff.org.uk/electricstext2.htm
MG Colours: http://www.teglerizer.com/mgcolors/